Sandbox Environment
If you’re configuring a TruSales sandbox environment use the following link: https://trusales-sandbox.primary-intel.com/
Production Environment
If you’re configuring a TruVoice Automation production environment use the following link: https://trusales.primary-intel.com/
To use TruVoice Automation you will need to configure the following settings:
- Outcome Types (required)
- Opportunity Amounts (required)
- Opportunity Types (required)
- Products (required)
- Close Date (required)
- TruVoice Program Products (required)
- TruVoice Survey Collector (required)
- Feedback Request Automation
- TruSales Users (as needed)
- Industries (optional)
- Forecast Categories (optional)
- Custom Filters (optional)
TruVoice Automation needs to know how to categorize each opportunity as a “Win,” “Loss,” or “No Decision” based on how your Salesforce environment is configured.
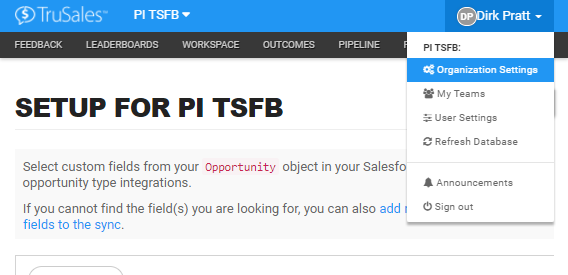
Log into TruVoice Automation and click on your name in the upper-right corner and then click on “My Organization”.
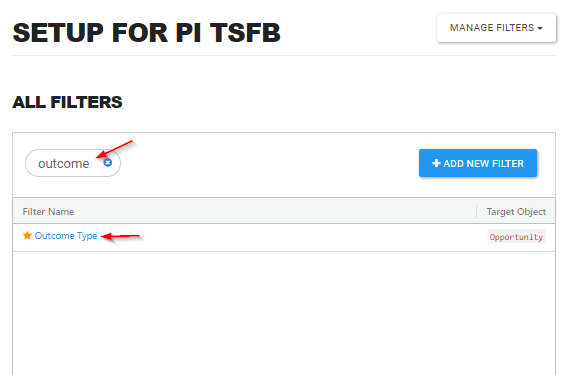
This will take you to the setup area in TruVoice Automation for your organization, where you will see all the standard TruVoice Automation filters.
Type “outcome” in the search bar to quickly locate the “Outcome Type” filter.
Click the Outcome Type filter’s blue text (not the edit button) and you will be presented with the Outcome Type configuration view where you will see a table that allows you to configure TruVoice Automation to recognize what you consider a won opportunity versus a lost opportunity versus an opportunity closed as a no decision.
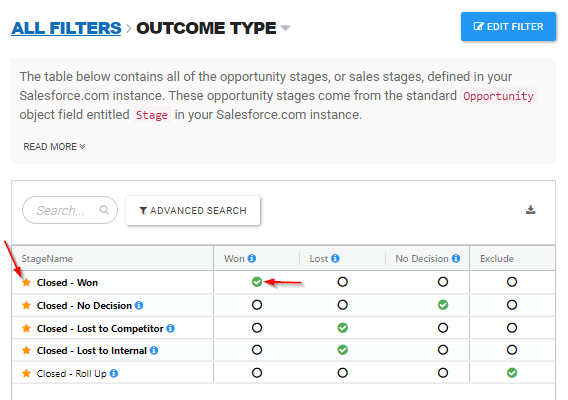
The first column in the table (in this case, StageName) displays a list of your organization’s sales stages that are considered “closed” sales stages. The gold star is displayed to the left of any sales stages that are active or enabled in your environment.
For each sales stage, indicate whether opportunities that are closed using that sales stage are considered a win, a loss, or a no decision.
Opportunity Amounts
You can configure the CRM field(s) that TruVoice Automation should use when displaying opportunity amounts and how you want opportunity amounts displayed in TruVoice Automation.
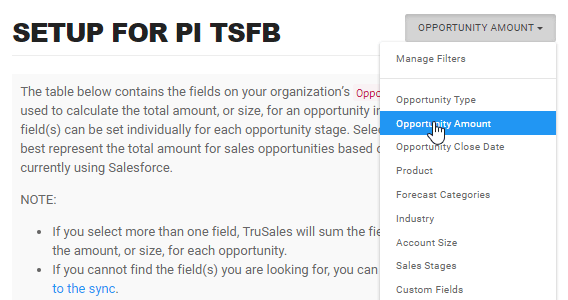
The first step is making sure TruVoice Automation uses the correct CRM field(s) when calculating opportunity amounts. We do this by clicking on the “Opportunity Amount” option in the setup control:
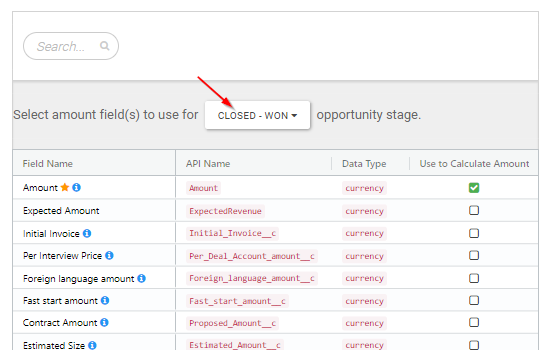
After you click on the “Opportunity Amount” option you will be presented with the Opportunity Amount configuration view where you will see a table that allows you to select one or more of your CRM fields to use for your opportunity amounts in TruVoice Automation.
The first column in the table (Field name) displays a list of your CRM’s currency and numeric fields. Enable the correct CRM field(s) TruVoice Automation should use to determine the amount for your opportunities. If you select more than one field, TruVoice Automation will sum the values of the selected fields to come up with the total amount for the opportunity.
In the table header, you will see the sales stage control that allows you to set the CRM field(s) to use for the opportunity amount by opportunity stage. Review and set the proper amount field to use in TruVoice Automation for each of your sales stages.
Currency Symbol Setup
Once you have selected the correct opportunity amount field(s) to use, you can configure how TruSales displays opportunity amounts.
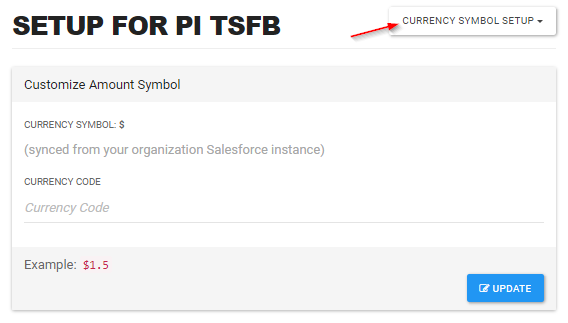
Click on the “Currency Symbol Setup” option in the setup control.
After you click on the “Currency Symbol Setup” option, you will be presented with a view that will allow you to configure how TruSales displays opportunity amounts. You can configure both the symbol that TruVoice Automation uses and the currency code, which are additional characters that are appended to the opportunity amount (e.g. MRR, ARR, Beds, Lives, etc.).
Once this step is completed, the amounts you see in TruVoice Automation will be displayed based on how you have configured them.
Opportunity Types
Next, configure TruVoice Automation to understand what you consider a new business opportunity versus a renewal opportunity versus add-on and upsell opportunities.
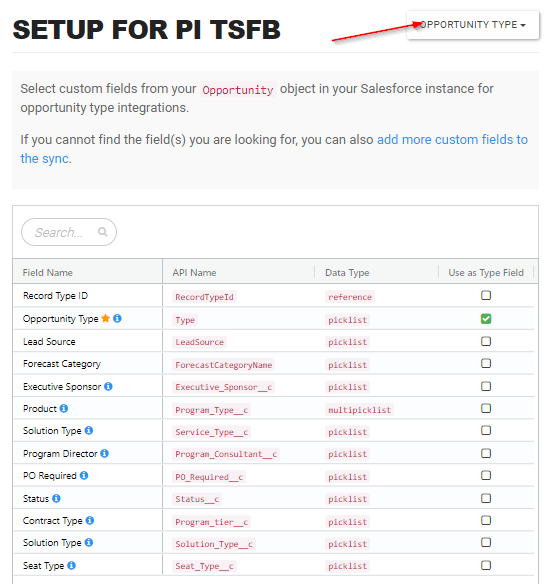
The first step is making sure TruVoice Automation uses the correct CRM field, or combination of fields, your organization uses to identify an opportunity’s type. We do this by clicking on the “Opportunity Type” option in the setup control.
After you click on the “Opportunity Type” option, you will be presented with the Opportunity Type configuration view where you will see a table that allows you to select one or more of your CRM fields to use to identify opportunity types in TruSales.
The first column in the table displays a list of your CRM’s picklist or multi-picklist fields you have enabled in TruVoice Automation. Select the correct CRM field TruSales should use to determine opportunity type (e.g. New Business, Renewal, Add-on, or Upsell). Or, select Record Type ID if you use Salesforce opportunity records to determine opportunity types.
Once you have selected the correct Opportunity Type field(s) to use you can map the values of the fields selected to the TruSales values of new business, renewal, add-on and upsell.
Once you have selected the correct Opportunity Type field(s) to use you can map the values of the fields selected to the TruVoice Automation values of new business, renewal, add-on and upsell.
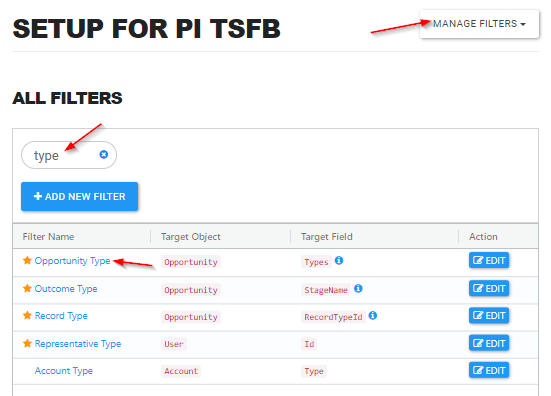
Click on the setup control and select “Manage Filters”.
Type “type” into the filters search control to narrow the filters and then click the “Opportunity Type” filter.
After you click “Opportunity Type” filter option you will be presented with the Opportunity Type configuration view where you will see a table that allows you to configure TruVoice Automation to recognize what you consider a renewal, new business, add-on, or upsell opportunity.
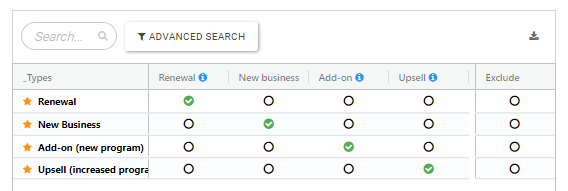
The second column in the table (_Types in the example) displays a list of the possible values for the Opportunity Type CRM field(s) you selected. The gold star next to the values indicates that value is currently active or enabled in your CRM.
For each value in the table, indicate how TruVoice Automation should categorize opportunities that have that value.
Configuring Products
Next, configure TruVoice Automation to be able to understand the major products, solutions, or product families that you sell. Completing this configuration step will allow you to further analyze your outcome rates, pipeline, and forecasts by product segments, giving you deeper insights in how you can improve your revenue results.
Use of the word “product” is meant to cover all tangible and intangible products, including services. Product, in TruVoice Automation, is also synonymous with solution. A product can be any tangible product or service that your buyers can recognize by name and purchase. It is generally the highest logical level of product or product family that a buyer evaluates when making a purchase decision.
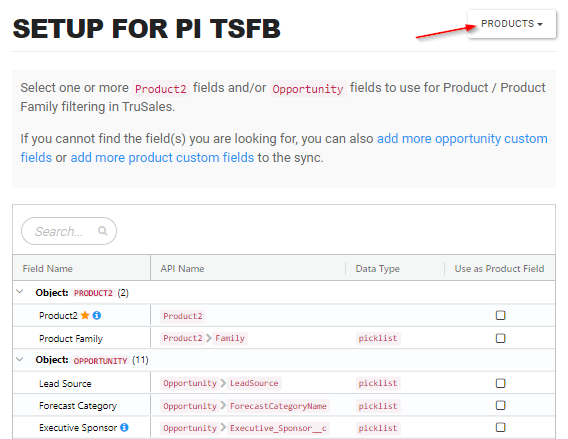
The first step is making sure TruVoice Automation uses the correct CRM field, or combination of fields, to identify an opportunity’s product. We do this by clicking on the “Product” option in the setup control.
After you click on the “Product” option, you will be presented with the Product configuration view where you will see a table that allows you to select one or more of your CRM fields that will be used to identify your product families in TruVoice Automation.
The first column in the table displays a list of picklist or multi-picklist fields, by Salesforce object, you have enabled in TruVoice Automation.
The second column in the table (_Types in the example) displays a list of the possible values for the Opportunity Type CRM field(s) you selected. The gold star next to the values indicates that value is currently active or enabled in your CRM.
Opportunity Close Date
Next, configure TruSales to make sure it uses the proper close date for your opportunities.
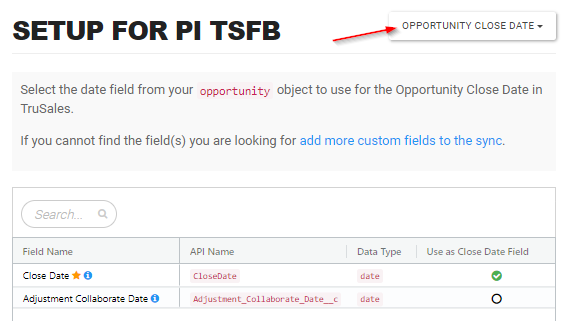
The first step is making sure TruSales uses the CRM field you use for your opportunity close dates. Click on the “Opportunity Close Date” option in the setup control.
After you click on the “Opportunity Close Date” option, you will be presented with the Close Date configuration view where you will see a table that allows you to select the opportunity date field that should be used to identify when an opportunity is closed.
The first column in the table displays a list of Opportunity date fields enabled in TruSales. Select the field TruSales should use to determine an opportunity’s close date.
TruVoice Program Products
Next, configure TruSales to communicate correctly with TruVoice by mapping the product values of the CRM field you selected in the Configuring Products step above to the products setup in TruVoice.
NOTE: Your program administrator, working with your Primary Intelligence resource, will need to have completed the product configuration steps in TruVoice.
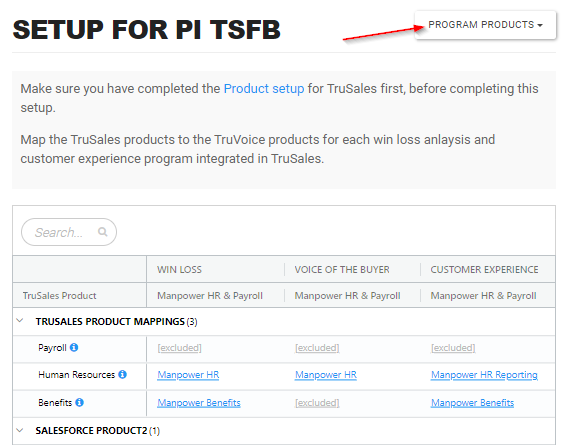
Click on the “TruVoice Program Products” option in the setup control.
You will be presented with the TruVoice Program Products configuration view where you will see a table that allows you to map your CRM product values to your TruVoice products.
The first column in the table displays your CRM product values. The second column displays your TruVoice program and provides a control to select the appropriate TruVoice product for each of your CRM product values.
TruVoice Survey Collector
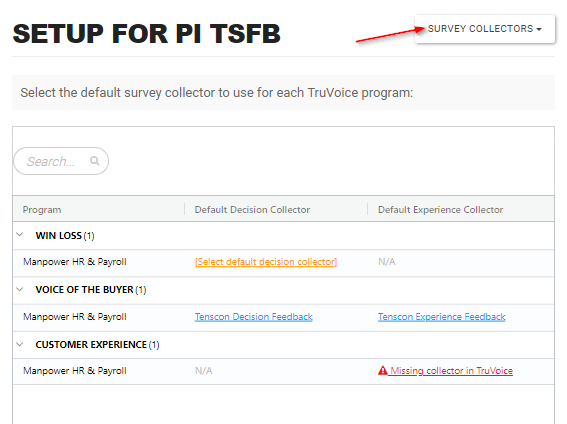
Next, configure TruSales to communicate with your TruVoice Survey Collector.
NOTE: Your program administrator, working with your Primary Intelligence resource, will need to have completed the survey collector configuration steps in TruVoice.
Click on the “TruVoice Survey Collector” option in the setup control.
You will be presented with the TruVoice Survey Collector configuration view where you will see a table that allows you to map your Decision Collector and/or your Experience Collector.
The Decision Collector is used for buyer decision surveys, or your win loss program surveys. And the experience collector is used for collecting customer experience feedback. Select the appropriate survey collector(s) for your program.
Feedback Request Automation
If you are enabling automation and have completed the TruVoice Program Products and TruVoice Survey Collector steps, you can configure your program’s feedback request automation settings.
NOTE: This part of TruSales is where you control how TruSales communicates with the TruSales Discovery Bots for Salesforce app installed in your Salesforce environment.
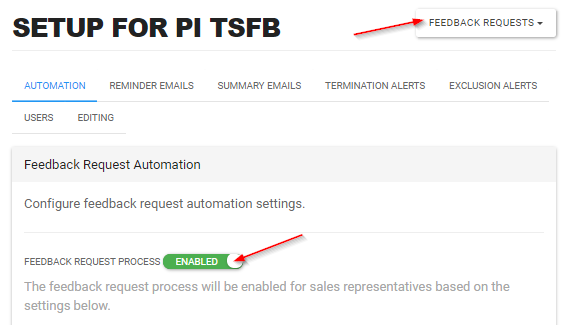
Click on the “Feedback Request Automation” option in the setup control.
You will be presented with the automation configuration view where you will see the automation options available in TruSales.
On the “Automation” tab, enable the “Feedback Request Process”.
You can set the Automation Type to “Manual” if you are not ready to turn on partial or full automation and no automation will be performed for sales reps inside of Salesforce.
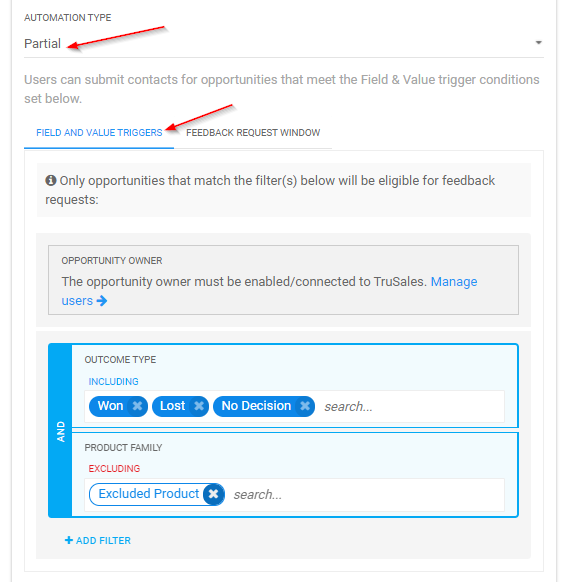
Partial Automation
When the partial automation mode is selected, opportunities that meet the “Field and Value Trigger” conditions will be eligible for feedback requests and users enabled in TruSales will see the Feedback Request Button in Salesforce.
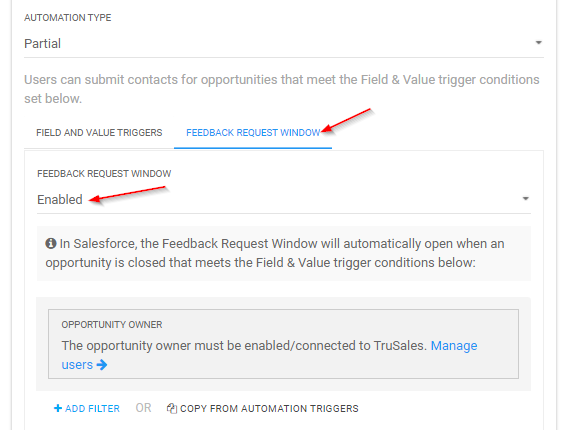
If the Feedback Request Window has also been enabled, when an opportunity meets the trigger conditions set in the “Field & Value Triggers” section, the TruSales Feedback Request Window will open automatically for the user and allow them to select contact(s) to submit for feedback requests.
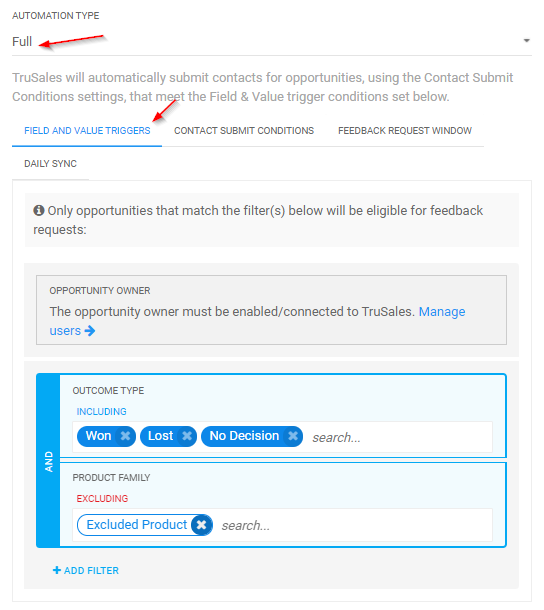
Full Automation
When the full automation mode is selected, opportunities that meet the trigger conditions set in the “Field and Value Trigger” section will be eligible for feedback requests and TruSales will automatically submit contacts based on the options selected in the “Contact Submit Conditions” section.
If the Feedback Request Window has also been enabled, when an opportunity meets the trigger conditions set in the “Field & Value Triggers” section, the TruSales Feedback Request Window will open automatically for the user and allow them to select additional contact(s) to submit for feedback requests and/or cancel feedback requests for any contacts automatically submitted by TruSales.
If “Summary Emails” have been turned on, then a summary email of the contacts that have been submitted for feedback requests will be sent according to the Summary Emails settings.
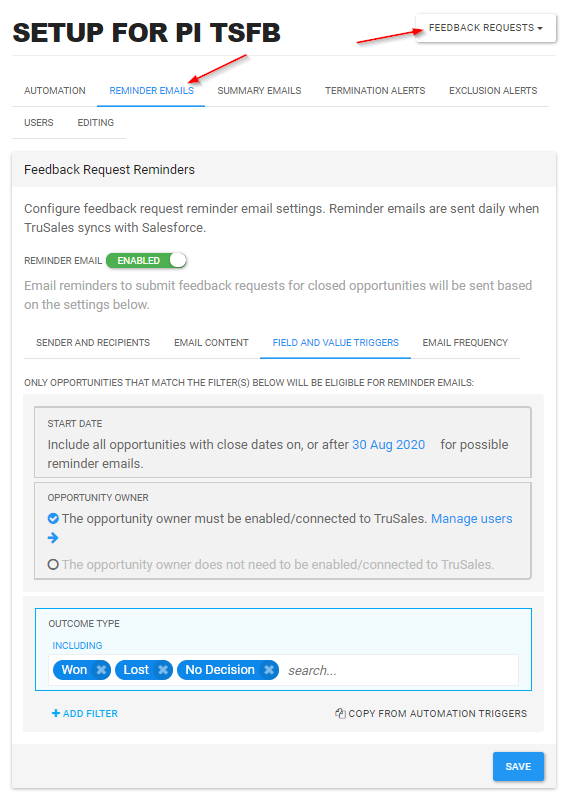
Reminder Emails
You can configure TruSales to send reminder emails to opportunity owners when an opportunity meets the trigger conditions set in the “Field and Value Triggers” section and does not have at least one contact that has been submitted for feedback requests.
Enable the reminder email and set the start date you want TruSales to use when evaluating opportunities.
Only opportunity owners with opportunities that have close dates on, or after the start date and meet the trigger conditions set in the “Field and Value Triggers” will receive reminder emails.
Configure the following sections to for your reminder emails:
- Sender and Recipients = configure who the email will be sent from and the recipients of the email
- Email Content = define the content of the reminder email
- Field and Value Triggers = set the trigger conditions an opportunity must meet for a reminder email to be sent
- Email Frequency = configure the number of reminders that will be sent and the days between reminders until one or more contacts are submitted for an opportunity
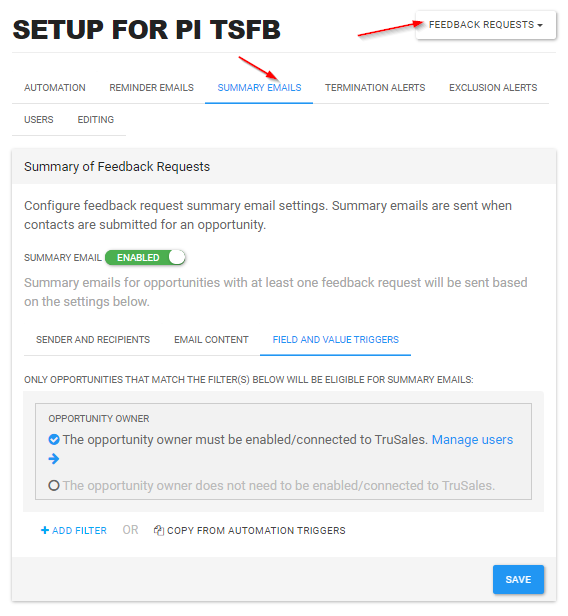
Summary Emails
You can configure TruSales to send summary emails to opportunity owners, and others, when one or more contacts for an opportunity are submitted for feedback requests and the opportunity meets the trigger conditions set in the “Field and Value Triggers” section.
Summary emails indicate which contact(s) have been submitted for feedback requests for an opportunity.
Enable the summary email and configure the following sections to for your summary emails:
- Sender and Recipients = configure who the email will be sent from and the recipients of the email
- Email Content = define the content of the reminder email
- Field and Value Triggers = set the trigger conditions an opportunity must meet for a summary email to be sent
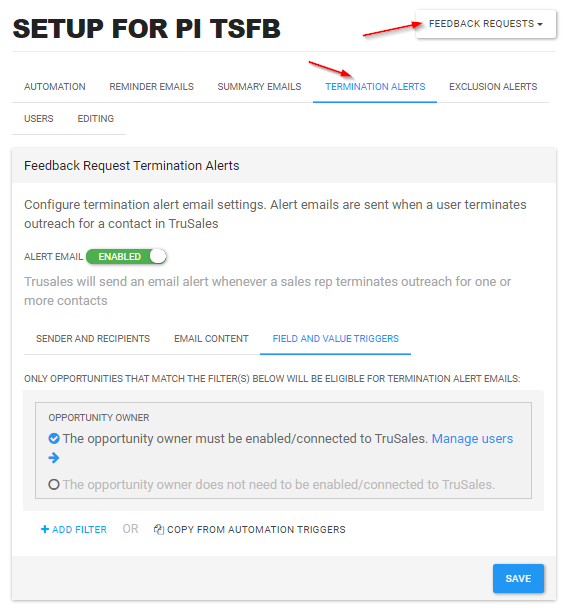
Termination Emails
You can configure TruSales to send termination emails when the feedback requests for one or more previously submitted contacts are terminated for opportunities that meet the trigger conditions set in the “Field and Value Triggers” section.
Termination emails indicate which contact(s) have had their feedback requests terminated and the reasons provided by the user that terminated the outreach.
Enable the termination email and configure the following sections to for your termination emails:
- Sender and Recipients = configure who the email will be sent from and the recipients of the email
- Email Content = define the content of the reminder email
- Field and Value Triggers = set the trigger conditions an opportunity must meet for a termination email to be sent
Users Invitation System
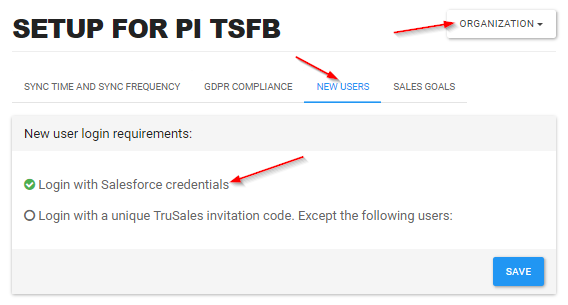
Next, you can configure how you want to add users to TruSales.
NOTE: You can skip this step if you want to keep TruSales as an “invitation only” system. This means that users can only get access to TruSales if a TruSales admin sends the user a TruSales invitation URL.
Click on the setup control and select “Organization Setup”.
Select the “Invitation Exclusion List” tab and select the “All users will be able to login to TruSales without invitation codes”.
When this option is enabled, your users that have a Salesforce account, you can simply access TruSales by clicking on the TruSales sign-in URL (trusales.primary-intel.com/signin) and clicking on the “Login with Salesforce” button.
TruSales Users
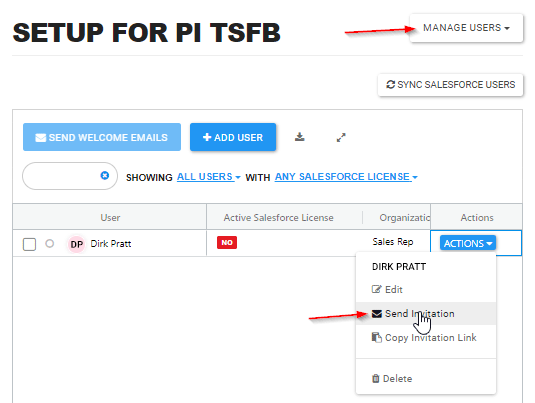
Next, you can add users to TruSales through the Manage Users interface in the setup area for TruSales.
NOTE: If you enabled all users to login to TruSales without an invitation code in the previous step, you will not need to send users a welcome email. And can instead simply give them the TruSales sign-in URL: trusales.primary-intel.com/signin
Click on the setup control and select “Manage Users”.
TruSales automatically creates a user for all active Salesforce users. You can invite any of these users by clicking the “Actions” button for a user and clicking the “Send Invitation” option, which will cause TruSales to send an email invitation to that user inviting them to log into TruSales with a URL that is specific to that user.
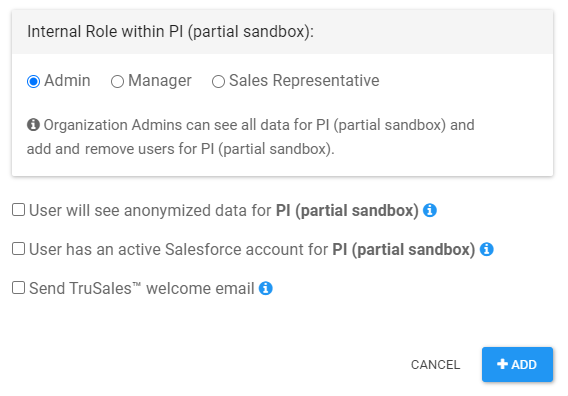
To add other non-Salesforce users, click the “Add User” button where you will be able to enter the user’s name and email address and select their TruSales role.
A few things to know about TruSales roles:
- Users with the Admin role have access to the setup area for TruSales and edit or change all of the things outlined in this document, including adding other users
- Users with the Manager role can see all opportunities and accounts in TruSales, but will not have access to the setup area for TruSales
- Users with the Sales Representative role can only see the opportunities and accounts they own in TruSales
Finally, you will select the type of login the user will use and whether to immediately send the TruSales invitation email to them.
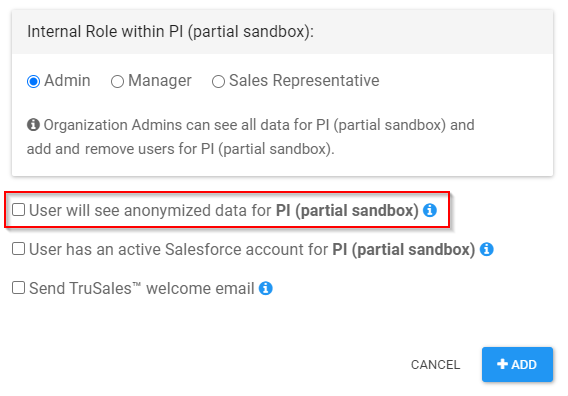
If you enable the “User will only see anonymized data for [your organization]” option for the user, then identifying information like contact names, opportunity names, account names, and sales representative names will be anonymized. Users with this option enabled will still be able to see amounts and outcome rates but will not have access to any identifying information in TruSales.
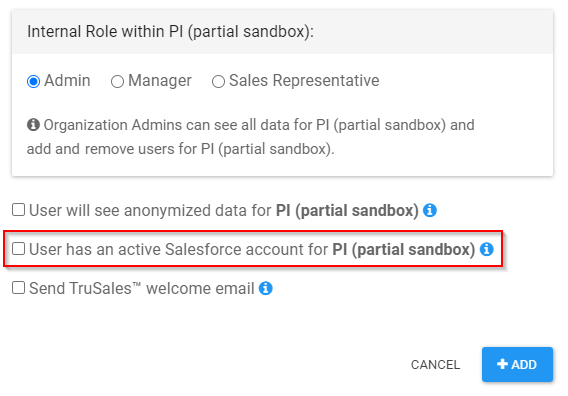
If you enable the “User has an active Salesforce account for [your organization]” option for the user, then they will use the “Login with Salesforce” button to log into TruSales and Salesforce will authenticate the user.
If you disable the “User has an active Salesforce.com account for [your organization]” option for the user, then they will use the forms-based login option and enter their email address and a password they will be prompted to create when they first login to TruSales. This option allows you to add users to TruSales who do not have a Salesforce license.
If you enable the “User has all necessary data rights needed to sync [your organization] data to TruSales” option for a Salesforce user, then that user’s login can be used as a backup integration user if the primary integration user is disabled. Only enable this option for users that have Salesforce System Administrator-level rights.
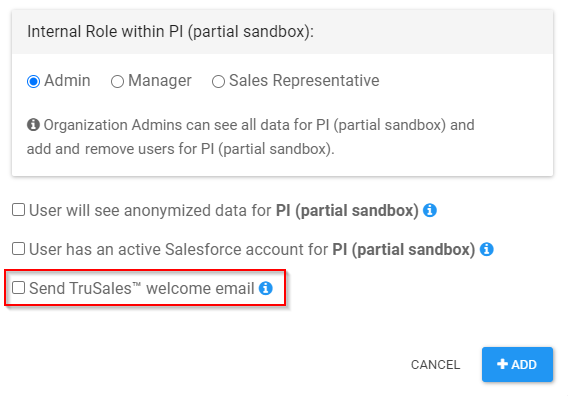
Finally, if you enable the “Send TruSales welcome email” option for the user, a TruSales email invitation will be sent as soon as the new user is added to TruSales. Disabling this option allows you to add a new user and send the invitation email later.
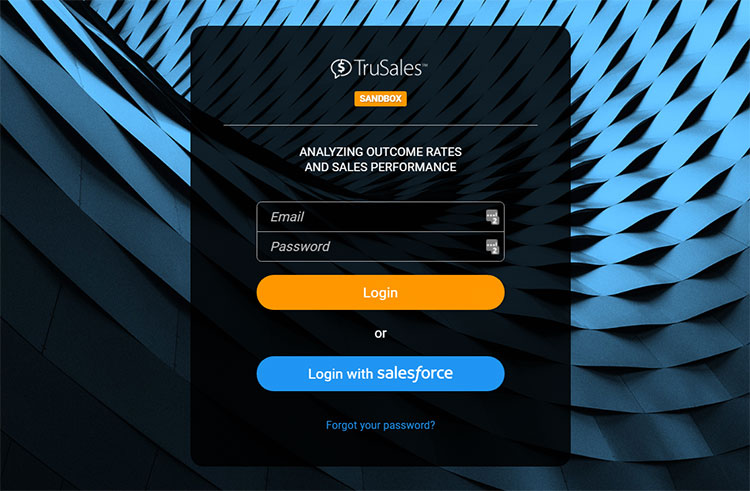
When the user attempts to log into TruSales they will see the TruSales login options.
Salesforce users should always click the “Login with Salesforce” button. And non-Salesforce users will enter their email address and password to access TruSales.
Industries
Next, configure TruSales to understand the industries, or types of businesses, that you sell to. Completing this configuration step will allow you to further analyze your outcome rates, pipeline, and forecasts by industry giving you deeper insights into how you can improve your revenue results.
Configure TruSales to use the correct CRM field, or combination of fields, that identify an opportunity’s industry/business type.
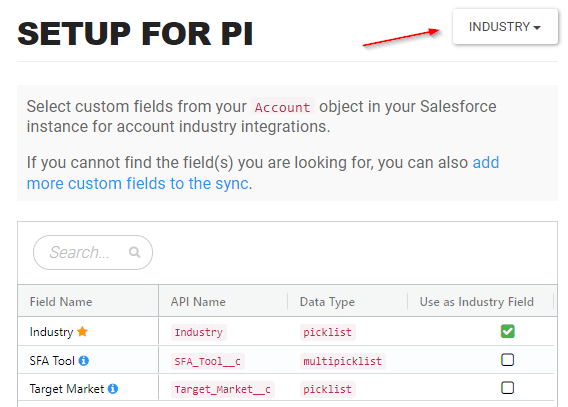
Click on the “Industry” option in the setup control.
After you click on the “Industry” option, you will be presented with the Industry configuration view where you will see a table that allows you to select one or more of your CRM fields that will be used to identify industries, or business types, in TruSales.
The first column in the table displays a list of Account picklist or multi-picklist fields enabled in TruSales. Select the field(s) TruSales should use to determine an opportunity’s industry type.
Forecast Categories
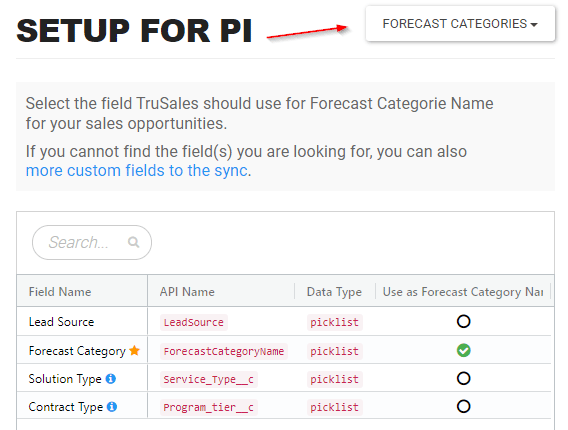
Next, configure TruSales to understand your forecast categories and the way you manage your forecasts. Completing this configuration step will allow you to leverage the Forecast views in TruSales.
Configure TruSales to use the correct CRM field that identify an opportunity’s forecast category.
Click on the “Forecast Category” option in the setup control.
You will be presented with the Forecast Category configuration view. The first column in the table displays a list of Opportunity picklist fields enabled in TruSales.
Select the field TruSales should use to determine an opportunity’s forecast category.
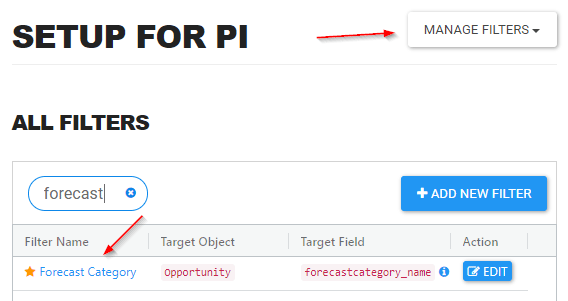
The next step is making sure TruSales understands your forecast categories.
Click on the setup control and select “Manage Filters”.
In the search control type “forecast” and click the “Forecast Category” filter option.
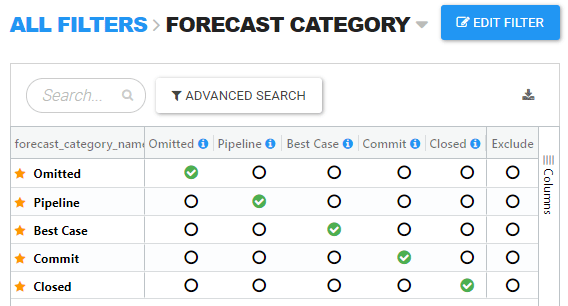
After you click the “Forecast Category” filter option, you will be presented with the configuration view where you will map your CRM’s forecast categories to the TruSales’ forecast categories.
The Forecast_Category_Name column in the table displays a list of your active forecast categories. Assign your forecast categories to the standard TruSales forecast categories (Commit, Best Case, Pipeline and Omitted).
Adding Custom Filters
TruSales can turn any CRM field into a filter option, allowing you to analyze outcome rates, pipeline, sales performance, and forecasts using that field as a filter. TruSales supports creating custom filters from CRM fields that belong to the following Salesforce objects:
- Opportunity
- Account
- Product
- OpportunityCompetitor
- Owner
When you create a custom filter, that filter becomes available to all TruSales users.
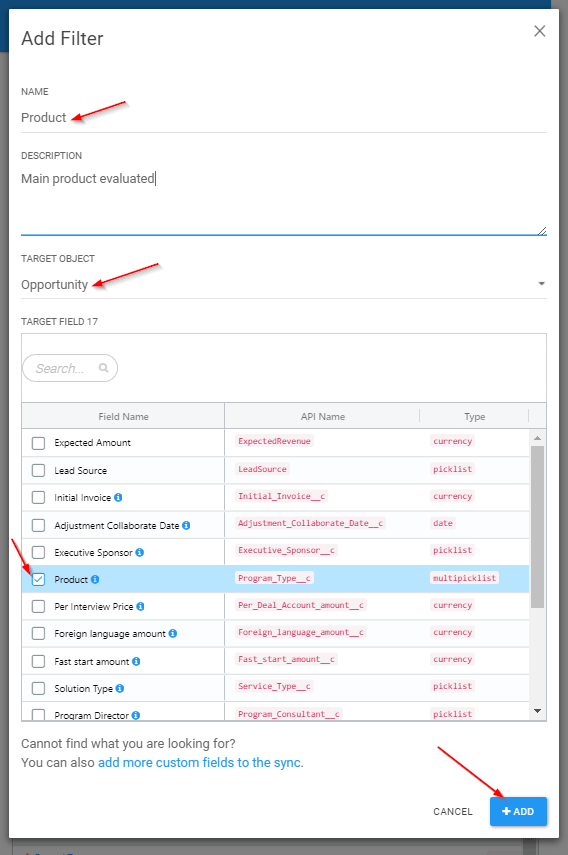
To create a custom filter, select “Manage Filters” in the setup control and click on the “Add New Filter” button:
In the “Add Filter” view, you begin by creating the name and description of the new filter you are adding. The filter name will be used by users to select and apply the filter in the various TruSales modules.
Next, select the target object, or the Salesforce object that contains the CRM field you want to base the filter on.
Once you select the target object, a table of that object’s CRM fields that can be enabled as a filter will be displayed. Scroll through the list, or use the text search control, to find the field you want to use and select that field.
Click the “Add” button to add the new custom filter to TruSales.