Once you have completed the Authorization step, you can now install the TruVoice Connect application in your Salesforce environment. This requires an Enterprise Salesforce license. If you do not have an Enterprise Salesforce license, we still have automation options for you. Just let your Customer Success Manager know you need to get started with an optional automation strategy.
Install TruVoice Connect in Salesforce
Use the appropriate link to install either the Sandbox or Production version of the application.
Sandbox Environment
If you are installing TruVoice Connect in a sandbox environment use the following link:
https://test.salesforce.com/packaging/installPackage.apexp?p0=04t4W000002V1nf
Production Environment
If you are installing TruVoice Connect in a production environment use the following link:
https://login.salesforce.com/packaging/installPackage.apexp?p0=04t4W000002V1nf
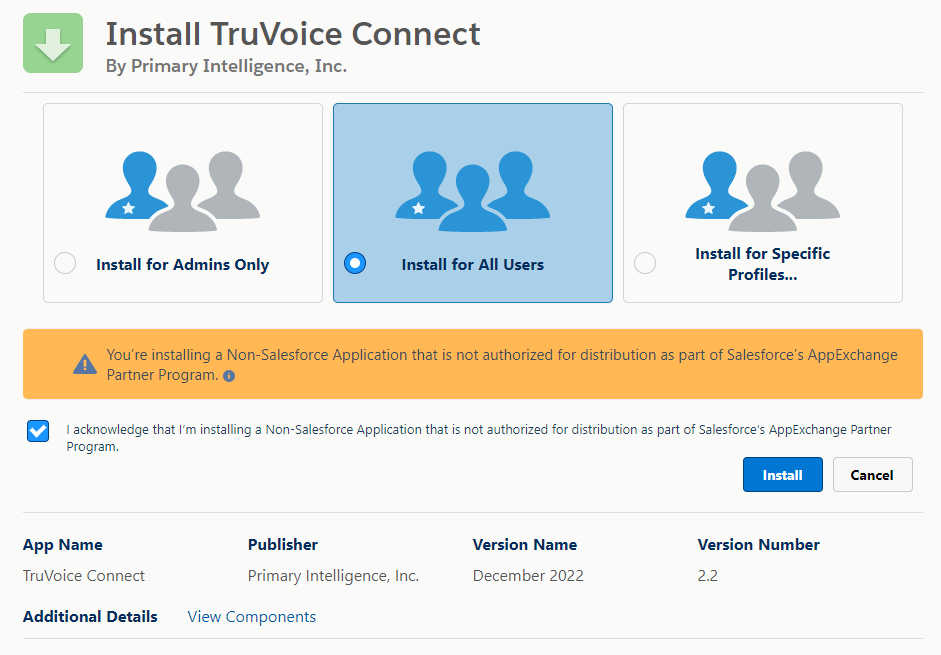
There are three options you’ll be presented with when installing the application:
- We recommend installing for All Users, which means all users will get the necessary Salesforce permissions, but will not be enabled for feedback requests until you enable them in TruVoice Automation.
- If you choose to install for Admins Only (not recommended), you will need to manually add the included “TruVoice Connect Permissions” permission set for all users who will be accessing opportunity records.
- Note: permissions need to be set for all users that access opportunity records as the app uses an Apex class to monitor whether a user has been enabled to request feedback for the opportunity
- If you choose to install for Specific Profiles (not recommended), set those profiles to “Full Access” to set the appropriate permissions for all users with those profiles.
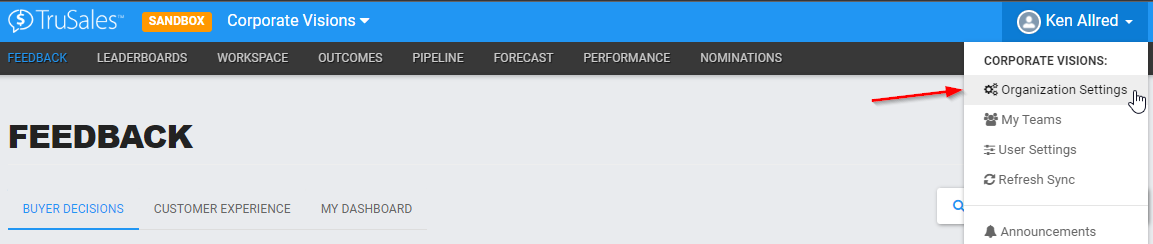
Once the app has been successfully installed, you will need to get your Access Token from TruVoice Automation. Log into TruVoice Automation, click on your name and then click the “Organization Settings” option.
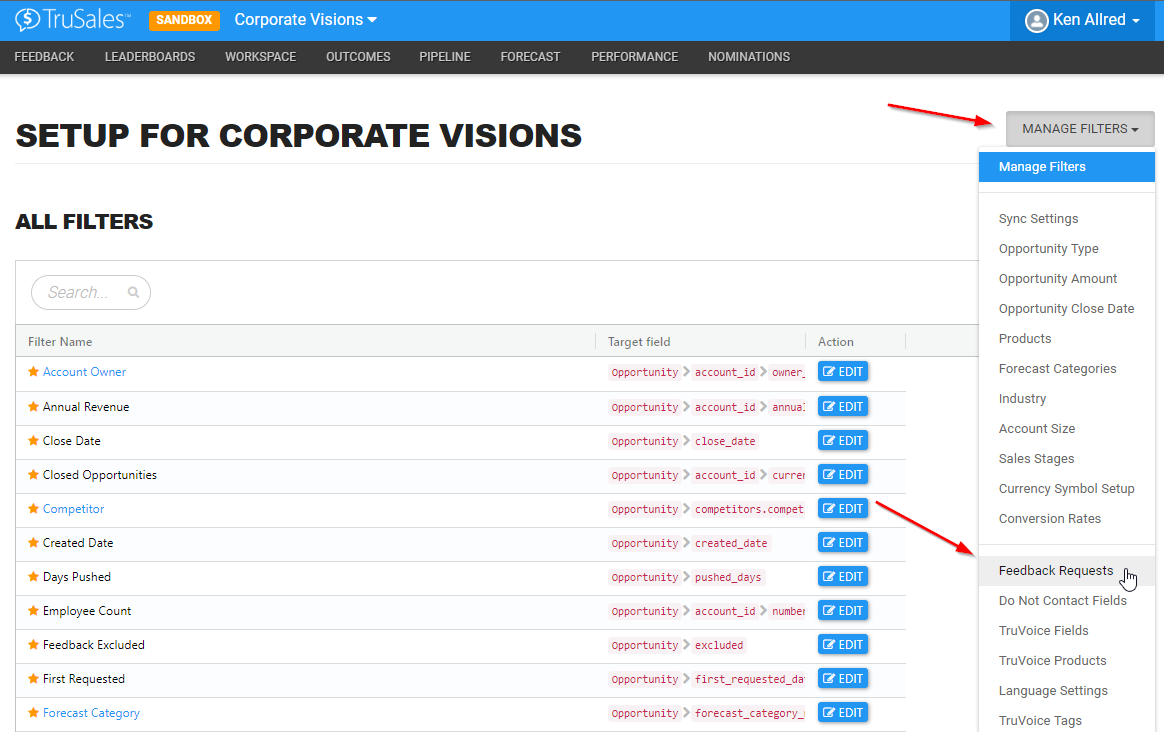
Click on the TruSales settings dropdown control and select the “Feedback Requests” option from the list of settings options.
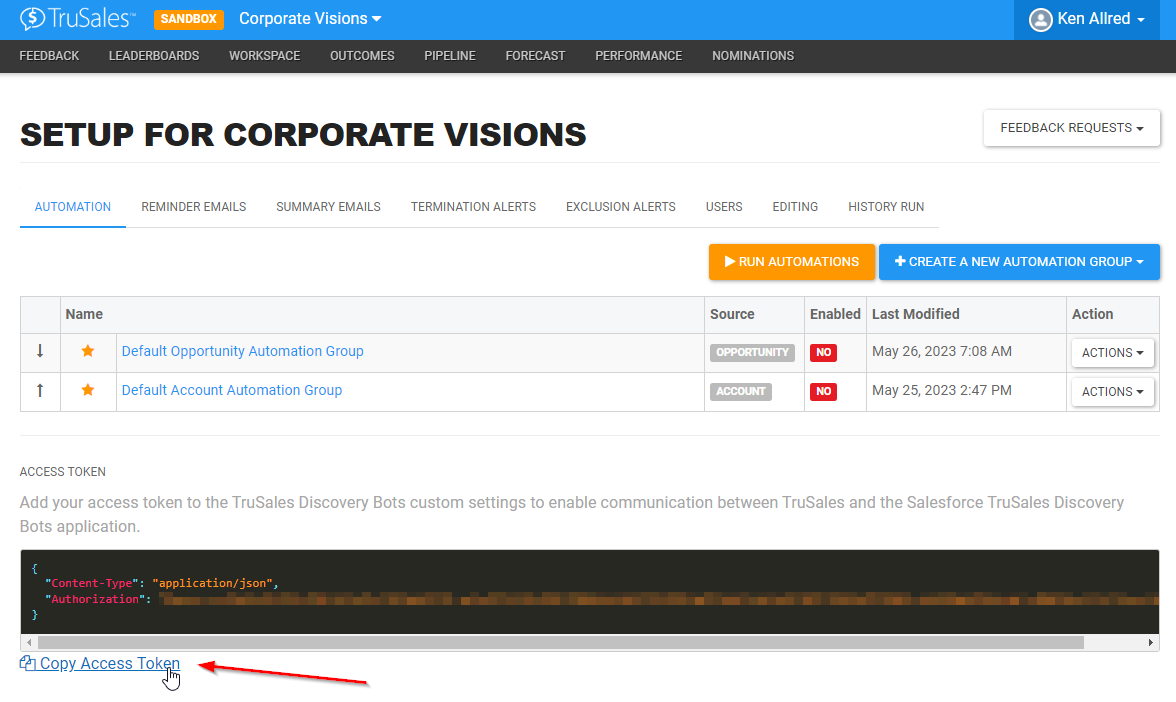
The Access Token can be found at the bottom of the page, on the Automation tab. Click the “Copy Access Token” link to copy the access token to your clipboard.
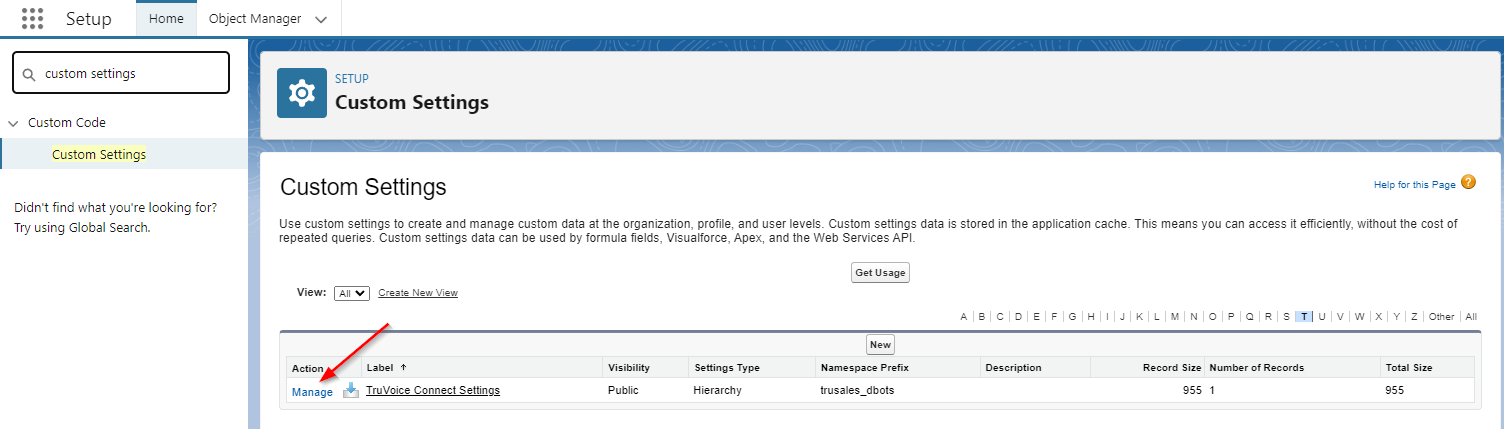
Now that you have the Access Token from TruVoice Automation create the custom settings record in Salesforce for the TruVoice Connect app.
In Salesforce setup, type “custom settings” in the Quick Find control and click on the “Custom Settings” link. Find the “TruVoice Connect Settings” in the list and click on the “Manage” link.
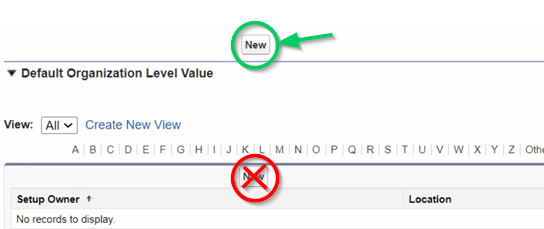
Click the “New” button in Custom Settings to add a Salesforce settings record for TruVoice Automation Discovery Bots.
Note: Make sure you click the “New” button at the TOP of the custom settings page and not the “New” button in the lower section.
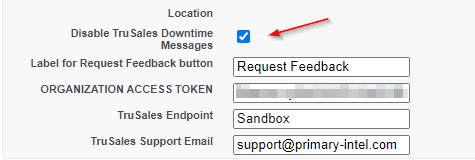
Note: If you clicked the correct “New” custom settings button, the Location setting will be blank as shown in the screenshot to the left. If the Location setting is not blank, go back to the previous step and make sure you click the “New” button at the top of the custom settings page.
Enter the button label text for the Feedback Request Button. This is the button you will place on your Opportunity Layouts that your users will use to request feedback.
Paste your organization’s access token into the Organization Access Token field. This is the value we copied from TruSales in the previous steps.
Note: The access token includes all of the text copied, including the word: “Bearer”.
Choose whether to disable TruSales Downtime Messages (recommended).
When this setting is enabled, if TruVoice Automation is brought down for maintenance a pop-up window is displayed to your users, informing them that TruSales is momentarily down. If you would prefer not to display this message to your users, check the “Disable TruVoice Automation Downtime Messages”.
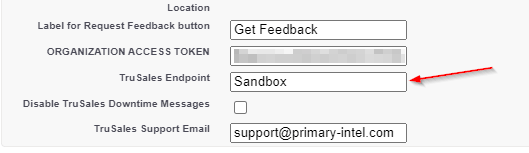
For Sandbox Installations:
In the TruVoice Automation Endpoint field, enter “Sandbox” if you are installing the application in a Salesforce sandbox environment.
For Production Installations:
Enter “Production” if you are installing the application in your production Salesforce environment.
Click “Save” to save the TruVoice Connect app’s Custom Settings.
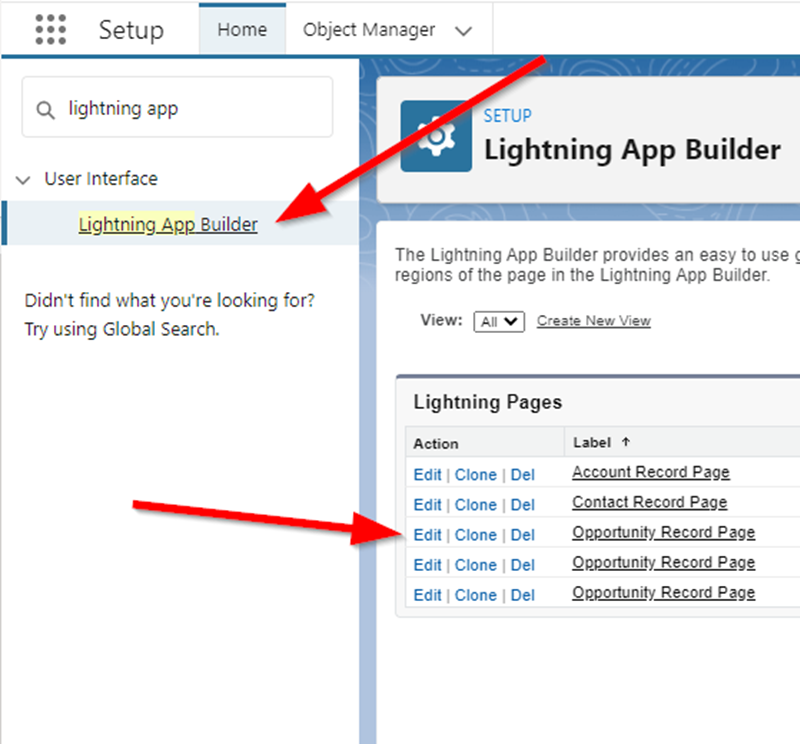
In Salesforce, navigate to Setup by clicking the cog icon in the upper right of the screen and selecting “Setup”.
In the Setup search control in the left panel search for “Lightning App Builder” and select it to see a list of Lightning apps or pages in your Salesforce Environment.
Click “Edit” next to the Opportunity Record Page used by your sales team.
Note: If your sales reps use more than one Opportunity layout, you will need to repeat these steps for each layout your sales reps use.
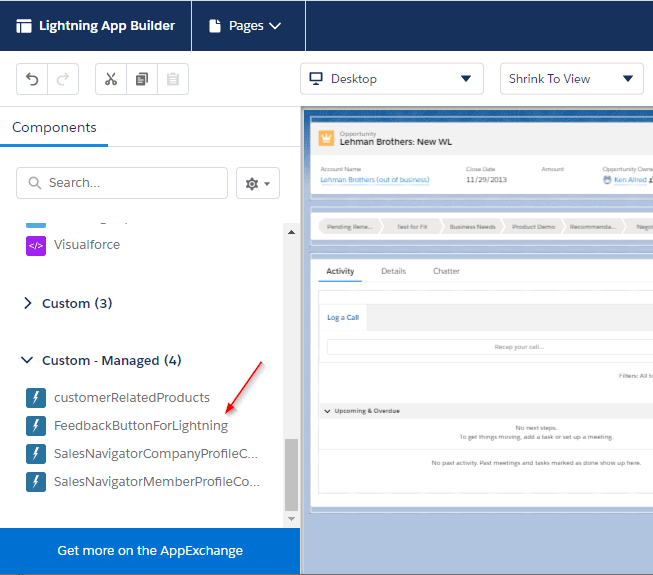
Use the search control to find the FeedbackButtonForLightning.
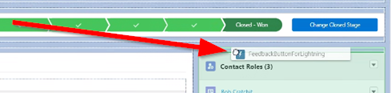
Drag the Button on to the page layout. While the button can be placed anywhere, we recommend placing on top of the right hand column as shown here. Save the page after you have made changes.
Repeat these steps to place the button on any other opportunity layouts used by your sales team. Then close the Lightning App Builder.
Note: Button visibility is controlled in TruVoice Automation. You will not see the button for the opportunity unless it is turned on in TruSales. Only one button should be installed on any given opportunity layout.
You have now completed the installation step. See below for optional instructions for installing the custom button for Classic layouts, or the standard buttons for Lightning or Classic layouts. Be aware that using these buttons may limit some functionality, such as our ability to not display the button on opportunities that don’t meet your criteria.
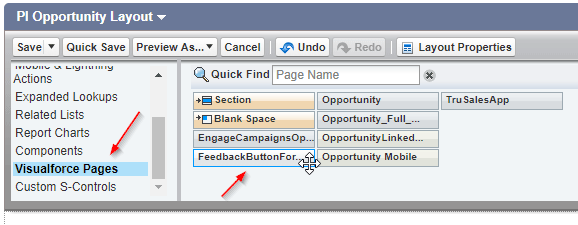
Custom Button for Classic Opportunity Layouts
Open the Opportunity Layout and select the “Visualforce Pages” option and drag the “FeedbackButtonForClassic” component to the layout:
Save the page and open an opportunity that meets the trigger conditions you have setup in TruSales settings. You should now see the button.
Note: You will not see the button for the opportunity unless your user (the user you are logged into Salesforce as) has been setup in TruVoice Automation and the Feedback Request Process setting in TruVoice Automation Feedback Request Automation setting is set to “Enabled”.
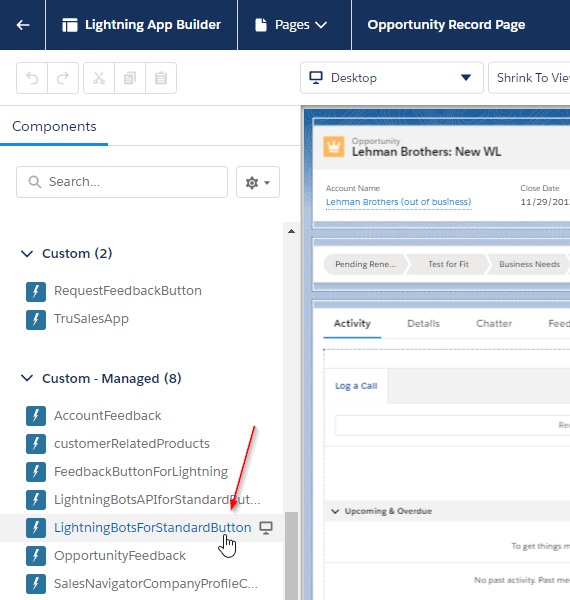
Standard Button for Lightning Opportunity Layouts
Open the Opportunity Lightning Record Page(s) in Lightning App Builder and drag the “LightningBotsforStandardButton” invisible component to the layout (this component is not visible to end users and can be placed anywhere in the layout):
Save the page and exit the Lightning App Builder.
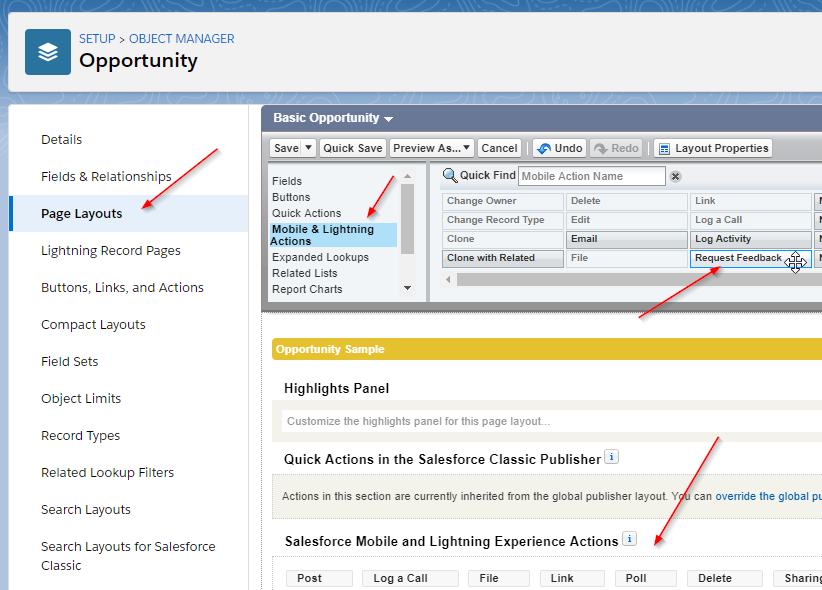
Next, edit the Page Layout(s) where you want the request feedback button to be available. Click on the “Mobile & Lightning Actions” option and find the “Request Feedback” action and drag it to the “Salesforce Mobile and Lightning Experience Actions” section:
Save the page layout.
Open an opportunity that meets the trigger conditions you have set in the TruVoice Automation Feedback Request Settings. You should now be able to click the button and have it open the TruVoice Automation feedback request page.
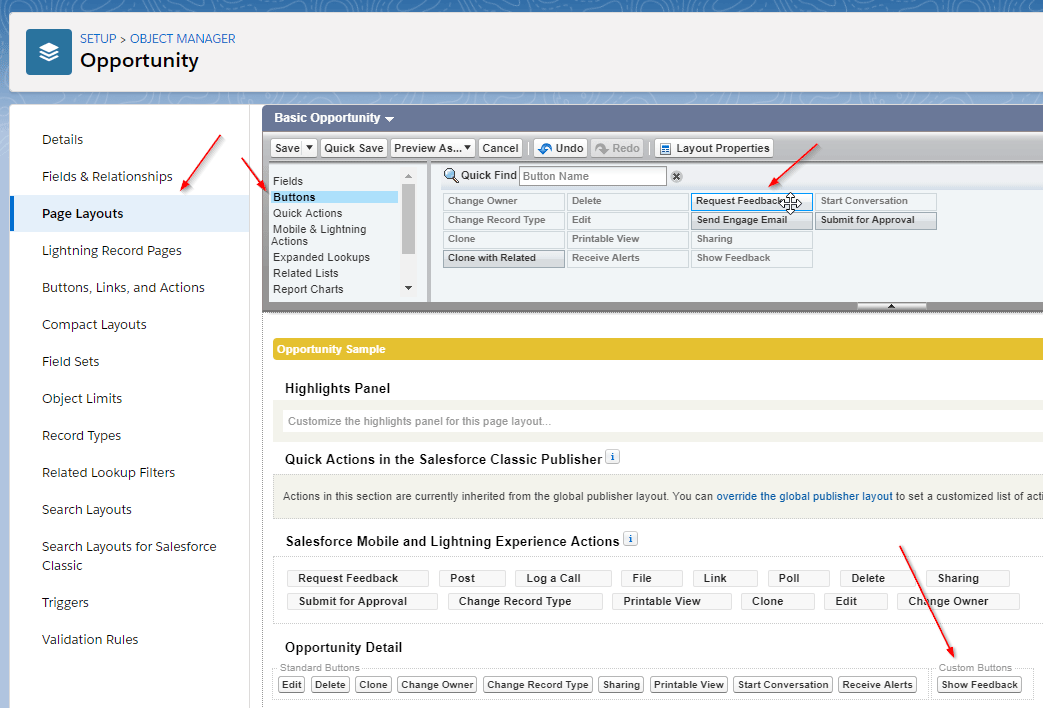
Standard Button for Classic Opportunity Layouts
For each opportunity layout you want the request feedback button available on, edit the page layout, click the “Buttons” section, find the “Request Feedback” button and drag it to the “Custom Buttons” section in the page layout:
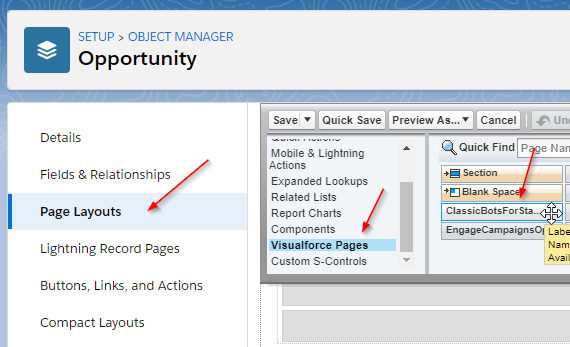
Next, click on the “Visualforce Pages” option and find the “ClassicBotsForStandardButton” Visualforce page and drag it to any convenient place in the layout.
This Visualforce page will be an invisible page that end users do not need to see and can be placed anywhere in the layout.
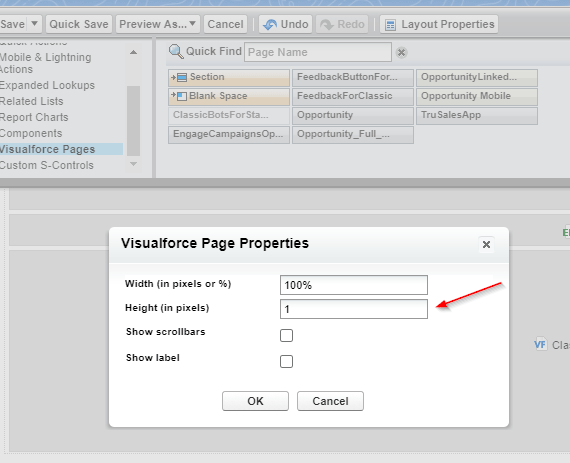
Set the height of the page to 1 so that it is invisible to your users and save your changes.
Open an opportunity that meets the trigger conditions you have set in the TruVoice Automation Feedback Request Settings. You should now be able to click the button and have it open the TruVoice Automation feedback request page.
Next, you'll need to install TruVoice Feedback.